Captcha Hacking(4) - Training with KNN Algorithm
Training with KNN Algorithm for Captcha Hacking (4)
Captcha Hacking Series
Captcha Hacking(1) - Defining the Problem
Captcha Hacking(2) - Collecting Data and Analyzing
Captcha Hacking(3) - Data Cleaning
Captcha Hacking(4) - Training with KNN Algorithm
Captcha Hacking(5) - Automating to solve the Captcha problem
Topic
Getting Training Dataset
Now that we have all the datas, we can get our training dataset into a file
knn_train.py
1
2
3
4
5
6
7
8
9
10
11
12
13
14
15
16
17
18
19
20
21
22
23
24
25
26
27
28
29
30
31
32
33
34
import os
import cv2
import numpy as np

# since we named each file (0-9) and (10='+', 11='-', 12='*')
file_names = list(range(0, 13))
train = []
train_labels = []

for file_name in file_names:
    path = './training_data/' + str(file_name) + '/'
    # read the number of images inside each file
    file_count = len(next(os.walk(path))[2])
    # for each image *.png file
    for i in range(1, file_count+1):
        img = cv2.imread(path + str(i) + '.png')
        gray = cv2.cvtColor(img, cv2.COLOR_BGR2GRAY)
        # put the gray image into train
        train.append(gray)
        # put the label(file_name) into train_label
        train_labels.append(file_name)

x = np.array(train)

# since we have 20x20 sized image, reshape to 1D array for training
train = x[:, :].reshape(-1, 400).astype(np.float32)
train_labels = np.array(train_labels)[:, np.newaxis]

# just to see the shape
print(train.shape)
print(train_labels.shape)

# save it as 'trained.npz'
np.savez('trained.npz', train=train, train_labels=train_labels)
Once we run it, we get output:
(34, 400) (34, 1)
| File |
 |
From this we can interpret that we have 34 images and their labels
Using KNN model
Now that we have our trained dataset, we can load the trained dataset and train using KNN model
run.py
1
2
3
4
5
6
7
8
9
10
11
12
13
14
15
16
17
18
19
20
import numpy as np
import cv2
import utils

# getting trained dataset
FILE_NAME = 'trained.npz'

# loading trained dataset
with np.load(FILE_NAME) as data:
    train = data['train']
    train_labels = data['train_labels']

knn = cv2.ml.KNearest_create()
knn.train(train, cv2.ml.ROW_SAMPLE, train_labels)

def check(test, train, train_labels):
    # find nearest 'k' characters, and determine the label for it
    # the reason why k = 1 here is because we have small dataset and since each numbers are in same size, we can use k = 1
    ret, result, neighbours, dist = knn.findNearest(test, k=1)
    return result
Checking Result
With our trained model, we can now check the result
run.py
1
2
3
4
5
6
7
8
9
10
11
12
13
14
15
16
17
18
19
20
21
22
23
24
25
def get_result (file_name):
image = cv2.imread(file_name)
# get the chars of image
chars = utils.extract_chars(image)
result_string = ''
for char in chars:
# after resizing the image, label them into 0-12
matched = check(utils.resize20(char[1]), train, train_labels)
# if matched number is 0-9 append it to result_string
if matched < 10:
result_string += str(int(matched))
continue
# if matched number is 10, append '+' to result_string
if matched == 10:
matched = '+'
# if matched number is 11, append '-' to result_string
elif matched == 11:
matched = '-'
# if matched number is 12, append '*' to result_string
elif matched == 12:
matched = '*'
result_string += matched
return result_string
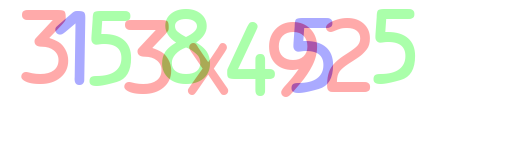
print(get_result('1.png'))
And we can see that our image below gives output:
31538*49525
This post is licensed under CC BY 4.0 by the author.