How to handle Data, and Images(6) Image Transformation
How to resize, translate, rotate image with OpenCV
Lesson Notes in .ipynb file
How to handle Data, and Images(6) - Introduction To OpenCV
Topics
Resizing Image
cv2.resize(image, dsize, fx, fy, interpoloation): Changes the size of the Image.
- dsize: Manual Size
- fx: x ratio
- fy: y ratio
- interpoloation: There are various interpoloation flags that could be used
- INTER_CUBIC: used to make Image size bigger
- INTER_AREA: used to make Image size smaller
- More here: https://docs.opencv.org/3.4/da/d54/group__imgproc__transform.html
Interpolation is used to control the values between pixels when Image’s size changes
1
2
3
4
5
6
7
8
9
10
11
12
13
14
15
16
import cv2
import matplotlib.pyplot as plt

image = cv2.imread('chanelsun.jpg')
plt.imshow(cv2.cvtColor(image, cv2.COLOR_BGR2RGB))
plt.show()

# resize the image with 2 * x value, and 2 * y value using INTER_CUBIC as interpolation
expand = cv2.resize(image, None, fx=2.0, fy=2.0, interpolation=cv2.INTER_CUBIC)
plt.imshow(cv2.cvtColor(expand, cv2.COLOR_BGR2RGB))
plt.show()

# resize the image with 0.8* x value, and 0.8* y value using INTER_AREA as interpolation
shrink = cv2.resize(image, None, fx=0.8, fy=0.8, interpolation=cv2.INTER_AREA)
plt.imshow(cv2.cvtColor(shrink, cv2.COLOR_BGR2RGB))
plt.show()
Output:
.PNG) | .PNG) | .PNG) |
Though the size doesn’t look like its changed, if you see the x, y value of the images, they are clearly changed
Image Translation
cv2.warpAffine(image, M, dsize): Translate the Image
- M: transformation Matrix
- dsize: Manual Size
M = $\begin{bmatrix}1 &0 & t_x \\ 0 & 1 & t_y \end{bmatrix} * \begin{bmatrix}x \\ y\end{bmatrix} = (x+t_x, y+t_y)$
1
2
3
4
5
6
7
8
9
10
11
12
13
14
15
16
import cv2
import numpy as np
import matplotlib.pyplot as plt

image = cv2.imread('chanelsun.jpg')

height, width = image.shape[:2]

# move x value to 200, and y value to 100 using Matrix multiplication
# [[1, 0, 200]  * [[x],   =  (x + 200, y + 100)
#  [0, 1, 100]]    [y]]
M = np.float32([[1, 0, 200], [0, 1, 100]])
dst = cv2.warpAffine(image, M, (width, height))

plt.imshow(cv2.cvtColor(dst, cv2.COLOR_BGR2RGB))
plt.show()
Output:
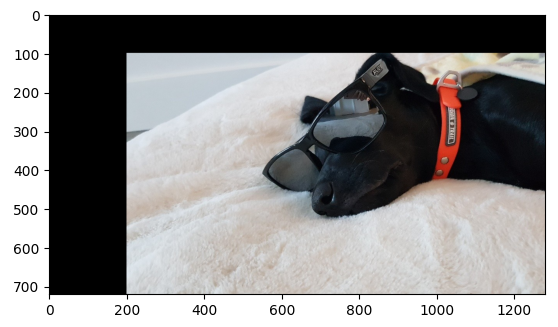
Using the information above, our transfomation matrix was
M = $\begin{bmatrix}1 &0 & 200 \\ 0 & 1 & 100 \end{bmatrix} * \begin{bmatrix}x \\ y\end{bmatrix} = (x+200, y+100)$.
As you see from the output, the image has been translated to x+200 and y+100
Image Rotation
The basic Matrix for rotation looks like this: $\begin{bmatrix} \cos{\theta} & -\sin{\theta} \\ \sin{\theta} & \cos{\theta} \end{bmatrix} $
If you wanted to add the rotation and scale, the rotation matrix becomes:
where $\alpha = scale * \cos{\theta}, \beta = scale * \sin{\theta}$
$\begin{bmatrix} \alpha & \beta & (1-\alpha) * center.x - \beta * center.y \\ -\beta & \alpha & \beta * center.x + (1-\alpha) * center.y \end{bmatrix} $
but because writing this matrix is complex, we have a function that makes this in openCV
cv2.getRotationMatrix2D(center, angle, scale): creates a transformation matrix for image rotation
- cetner: rotation center
- angle: rotation angle
- scale: scale factor
1
2
3
4
5
6
7
8
9
10
11
12
13
14
15
16
import cv2
import numpy as np
import matplotlib.pyplot as plt
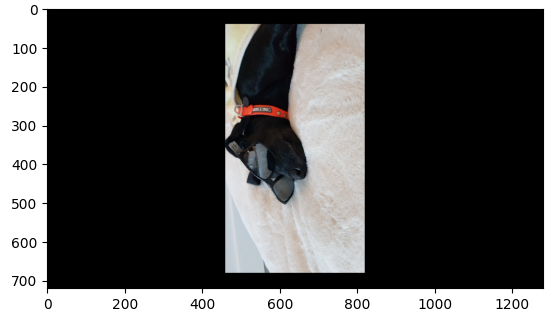
image = cv2.imread('chanelsun.jpg')
height, width = image.shape[:2]
# center = right in the middle of image, rotation = 90 degrees, scale/size = 0.5
M = cv2.getRotationMatrix2D((width / 2, height / 2), 90, 0.5)
print(M)
# using the rotation matrix, we rotate the image
dst = cv2.warpAffine(image, M, (width, height))
plt.imshow(cv2.cvtColor(dst, cv2.COLOR_BGR2RGB))
plt.show()
Output:
1
2
[[ 3.061617e-17  5.000000e-01  4.600000e+02]
 [-5.000000e-01  3.061617e-17  6.800000e+02]]
Summary
cv2.resize(image, dsize, fx, fy, interpoloation): Changes the size of the Image.
cv2.warpAffine(image, M, dsize): Translate the Image
cv2.getRotationMatrix2D(center, angle, scale): creates a transformation matrix for image rotation